虚拟机镜像的创建和 resize 流程
nova 创建虚拟机涉及的组件比较多,调用比较复杂,这里只列出跟虚拟机镜像创建相关的流程,方便理清虚拟机状态变化的整个流程。
nova-api
nova.api.openstack.compute.servers.ServersController.create() # 接受创建请求,解析出 image_uuid
  nova.compute.api.API.create ()
    nova.compute.api.API._create_instance() # 调用 glance api 获取 image 对象
      nova.conductor.api.LocalComputeTaskAPI.build_instances()
        nova.conductor.manager.ConductorManager.build_instances() # 此处虽然接收 block_device_mapping 参数,但是是为了兼容旧版,没有使用。实际通过 nova.objects.BlockDeviceMappingList.get_by_instance_uuid() 获取
          nova.compute.rpcapi.ComputeAPI.build_and_run_instance() # 使用 cast 方法调用 nova-compute 的 build_and_run_instance 方法。
nova-compute
nova.compute.manager.ComputeManager.build_and_run_instance()
  nova.compute.manager.ComputeManager._do_build_and_run_instance()
    nova.compute.manager.ComputeManager._build_and_run_instance()

      nova.compute.manager.ComputeManager._build_resources()
        nova.compute.manager.ComputeManager._prep_block_device()
          nova.virt.block_device.attach_block_devices()
            nova.virt.block_device.DriverImageBlockDevice.attach()
              nova.volume.cinder.API.create()

      nova.virt.libvirt.driver.LibvirtDriver.spwan()
        nova.virt.libvirt.driver.LibvirtDriver._create_image() # 此处会判断如果不是从 volume 启动,则调用 imagebackend 去创建虚拟机镜像
          nova.virt.libvirt.driver.LibvirtDriver._try_fetch_image_cache()
            nova.virt.libvirt.imagebackend.Image.cache()

              nova.virt.libvirt.imagebackend.Rbd.create_image()
                nova.virt.libvirt.imagebackend.Rbd.clone()
                  nova.virt.libvirt.storage.rbd_utils.RBDDriver.clone() # 创建虚拟机镜像,此处如果所使用的 image 后端不支持 clone,或者镜像不可 clone(比如 rbd 中不是 raw 格式的镜像),会触发异常,create_image 调用下面的 fetch_image 函数

                nova.virt.libvirt.utils.fetch_image()
                  nova.virt.images.fetch_to_raw()
                    nova.virt.images.fetch()
                      nova.image.API.download()
                    nova.virt.images.convert_image()
                      nova.virt.images._convert_image() # 将镜像拷贝到本地的/var/lib/instances/_base/目录下,文件名为 md5(image).part,然后用 qemu-img convert 转换为 raw 格式,名为 md5(image).converted,最后重命名为 md5(image)
                nova.virt.libvirt.storage.rbd_utils.RBDDriver.import_image() # 这一步是在 clone 失败,执行 fetch_image 的情况下,判断虚拟机镜像不存在,执行 import_image 将 fetch 的镜像导入到 RBD 后端作为虚拟机镜像。

                nova.virt.libvirt.storage.rbd_utils.RBDDriver.resize() # 调整虚拟机镜像大小

              nova.virt.libvirt.imagebackend.Rbd.resize_image() # 调整虚拟机镜像大小,RBD 后端实际上在 create_image 时已经 resize 了,不会执行这一步,这里应该是为了确保其他后端能够正确设置虚拟机镜像的大小
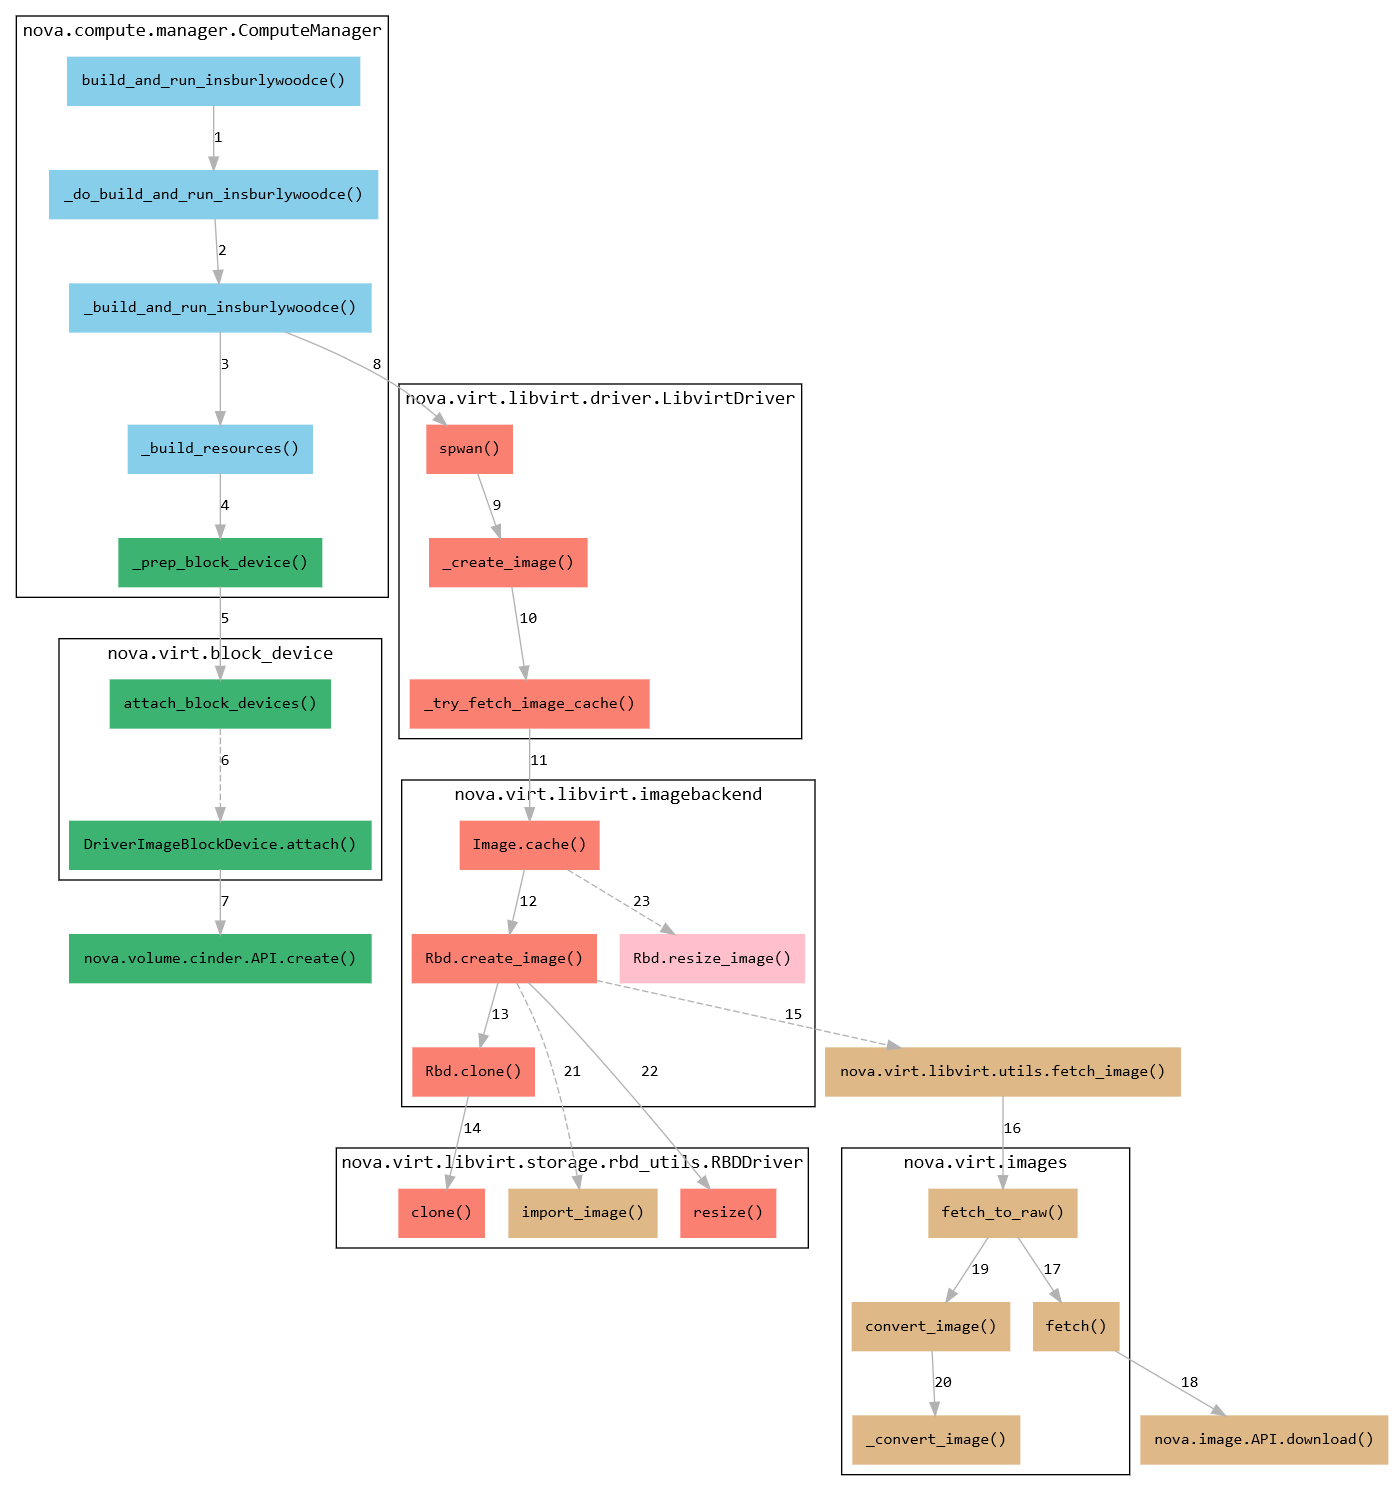
为了便于分析,用 graphviz 画了在 nova-compute 的调用关系图:

注:存储后端用的是 Ceph,所以调用的后端代码是 nova.virt.libvirt.imagebackend.Rbd,如果 nova 使用了不同的后端,比如本地的 qcow2 镜像、raw 镜像、lvm 等,只需要对照 nova.virt.libvirt.imagebackend 中提供的对应实现,出入不会太大,因为它们都继承 nova.virt.libvirt.imagebackend.Image,有相同的接口。
至此,虚拟机的镜像已经创建完毕,并且 resize 为 flavor 所设置的大小。后面是虚拟机启动后,resize 分区和文件系统的过程。
一般虚拟机镜像中会安装 cloud-init 或者配置启动脚本来对虚拟机做初始化配置。在 cloud-init 或启动脚本中调用 growpart 和 resizefs 来完成分区和文件系统的扩容。
分区的 resize
cloud-init 支持使用 growpart 和 gpart 对分区进行扩容,时配置的 mode 而定,默认会按顺序检测系统中是否安装了这两个工具,使用第一个找到的。
growpart 是 AWS 的扩展分区工具,它分别使用 sfdisk 和 sgdisk 对 MBR 和 GPT 分区表操作,先将分区表导出,然后改写分区的其实扇区位置,最后将改写后的分区表导入,完成分区的扩容。
# growpart [diskdev] [partnum]
gpart 是 FreeBSD 推出的磁盘管理工具,GPT 分区表将 metadata 的主本保存在硬盘的开始,将副本保存在硬盘的末尾,所以当虚拟机镜像被扩容,相当于硬盘的容量变大,在 GPT 看来末尾的 metadata 副本丢失了,需要先执行 recover 命令恢复,然后再进行扩容。
# gpart recover [diskdev]
# gpart resize -i [partnum] [diskdev]
文件系统的 resize
cloud-init 通过依次尝试解析 /proc/$$/mountinfo、/etc/mtab 和 mount 命令的输出,来获取根目录所挂载的分区和文件系统格式。
针对不通的文件系统,使用不同的命令扩容:
# resize2fs [devpth]    # ext 文件系统
# xfs_growfs [devpth]    # xfs 文件系统
# growfs [devpth]        # ufs 文件系统
# btrfs filesystem resize max [mount_point]    # btrfs 文件系统
文档信息
- 本文作者:Lewin
- 本文链接:https://lewinz.com/2021/08/01/openstack-nova-image-resize/
- 版权声明:自由转载-非商用-非衍生-保持署名