nova 创建虚机总流程
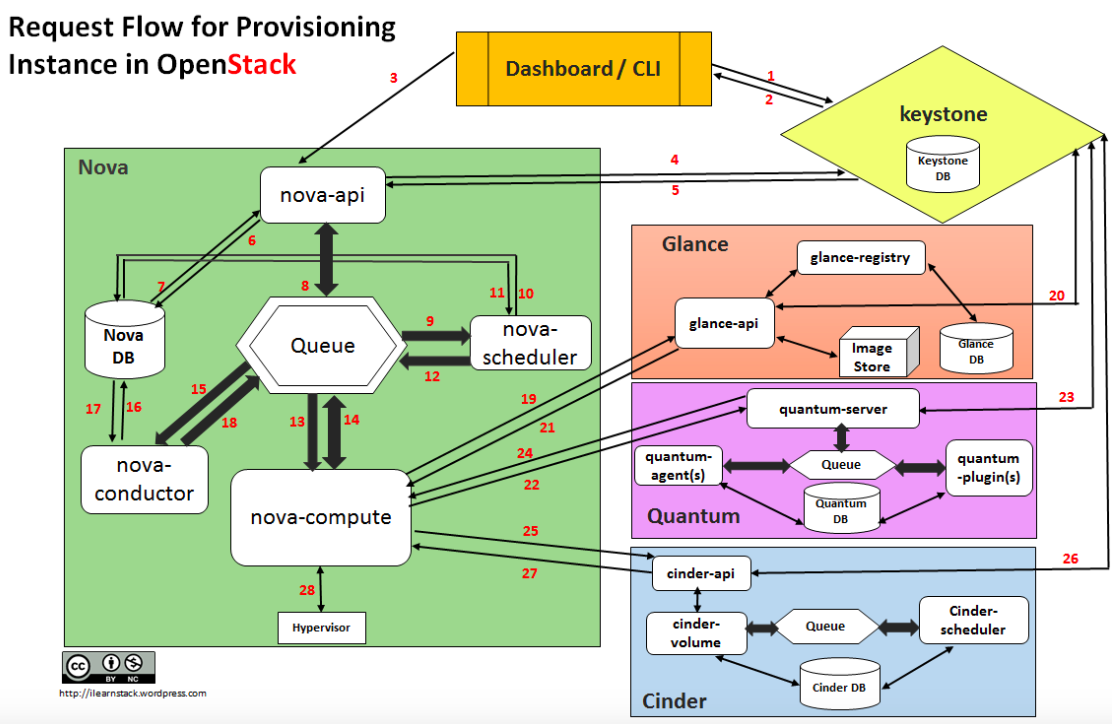
nova 创建虚机请求流
- Dashboard 或者 CLI 获取用户的登录信息,调用 Keystone 的 REST API 去做用户身份验证。
- Keystone 对用户登录信息进行校验,然后产生验证 token 并发回。它会被用于后续 REST 调用请求。
- Dashboard 或者 CLI 将创建虚机的 REST 请求中的‘launch instance’ 或‘nova-boot’ 部分进行转换,然后调用 nova-api 的 REST 接口。
- nova-api 接到请求,向 keystone 发送 auth-token 校验和权限认证请求。
- Keystone 校验 token,并将 auth headers 发回,它包括了 roles 和 permissions。
- nova-api 和 nova-database 进行交互。
- nova-database 为新实例创建一个数据库条目。
- nova-api 向 nova-scheduler 发送 rpc.call 请求,期望它能通过附带的 host ID 获取到数据库条目。
- nova-scheduler 从 queue 中获取到请求。
- nova-scheduler 和 nova-database 交互,获取集群中计算节点的信息和状态。
- nova-scheuler 通过过滤(filtering)和称重(weighting)找到一个合适的计算节点(host)。
- nova-scheduler 向找到的那个 host 上的 nova-compute 发送 rpc.cast 请求去启动虚机。
- 目标 host 上的 nova-compute 从 queue 中获取到请求。
- nova-compute 向 nova-condutor 发送 rpc.call 请求去获取待创建虚机的信息比如 host ID 和 flavor 等。
- nova-conductor 从 queue 中获取到请求。
- nova-conductor 和 nova-database 交互。
- nova-database 向 nova-conductor 返回虚机的信息。
- nova-conductor 向 nova-compute 发送 rpc.call,附带所请求的信息。图中应该是遗漏了一个步骤,就是 nova-compute 从 queue 中获取返回的数据。
- nova-compute 调用 glance-api 的 REST API,传入 auth-token,去根据镜像 ID 获取镜像 URI,从镜像存储中下载(原文为 upload)镜像。
- glance-api 向 keystone 校验 auth-token。
- nova-compute 获取 image 的元数据。
- nova-compute 调用 Neutron API ,传入 auth-token,去分配和配置网络,比如虚机的 IP 地址。
- neutron-server 通过 keystone 校验 auth-token。
- nova-compute 获得网络信息。
- nova-compute 调用 Cinder API,传入 auth-token,去将 volume 挂接到实例。
- cinder-api 通过 keystone 校验 auth-token。
- nova-compute 获得块存储信息。
- nova-compute 为 hypervisor driver 产生数据,并调用 Hypersior 执行请求(通过 libvirt 或者 api)。
下表列出了每个步骤中实例的状态:
| Status | Task | Power state | Steps |
|---|---|---|---|
| Build | scheduling | None | 3-12 |
| Build | networking | None | 22-24 |
| Build | block_device_mapping | None | 25-27 |
| Build | spawing | None | 28 |
| Active | none | Running |
nova compute 接到指令后开始创建虚机的代码分析 (第 19 步之后)
代码在 https://github.com/openstack/nova/blob/master/nova/compute/manager.py 中的 def _build_and_run_instance 函数中:
_build_resources // 准备网络和磁盘
    //Start building networks asynchronously for instance
    self._build_networks_for_instance //为 instance 准备网络资源,实际上是创建一个 neutron port
        macs = self.driver.macs_for_instance(instance) //分配 mac 地址。多绝大多数 hypersivor,返回 None,也就是不预先分配
        network_info =self._allocate_network //开始异步网络分配
            nwinfo = self.network_api.allocate_for_instance //Allocate network resources for the instance
                _validate_requested_port_ids //校验 port ids
                _validate_requested_network_ids //校验 network ids
                _clean_security_groups //删除 default 安全组
                _process_security_groups //Processes and validates requested security groups for allocation
                _create_ports_for_instance //Create port for network_requests that don't have a port_id
                    _create_port_minimal //如果 port 没有的话,则 Attempts to create a port for the instance on the given network.
                        port_client.create_port //调用 port api 来创建 port,包括创建 port,分配 MAC 及 IP 地址,更新数据库
                            _generate_mac //生成 MAC 地址
                            _create_port_with_mac //创建 port
                                //DHCP 相关操作:port 创建完成后会通知 neutron-dhcp-agent 去执行 port_create_end 函数,它会将 port 的 ip 和 mac 信息加载到 dnsmasq 所需的配置文件中
                            _allocate_ips_for_port //为 port 分配 IP,要么用户有指定,要么从 subnets 中选择一个
                                _allocate_specific_ip //如果指定了 IP
                                _generate_ip //如果没指定 IP
                    return requests_and_created_ports
                _update_ports_for_instance //为特殊 case 更新 port
                    _populate_neutron_extension_values
                    _populate_pci_mac_address //只用于处理 SRIOV_PF
                    _populate_mac_address
                    _update_port
                        port_client.update_port //将上述修改通过调用 port api 得以更新 port
                    _update_port_dns_name
                        neutron.update_port(port_id, port_req_body) //将 port 的 dns_name 设置为 hostname
                nw_info = self.get_instance_nw_info
                    _build_network_info_model //Return list of ordered VIFs attached to instance
                        _gather_port_ids_and_networks //Return an instance's complete list of port_ids and networks
                            ifaces = instance.get_network_info()
                return nw_info

    //Start building block device mappings for instance
    self._prep_block_device //Set up the block device for an instance with error logging
        block_device_info = driver.get_block_device_info(instance, bdms) //Converts block device mappings for instance to driver format
        mapping = driver.block_device_info_get_mapping(block_device_info)
            return block_device_mapping
        driver_block_device.attach_block_devices //nova/virt/block_device.py
            _log_and_attach
                //首先找出 instance 将从哪里启动,可能从 volume,snapshot,image 上启动
                bdm.attach //真正做 attach 操作
        _block_device_info_to_legacy
        return block_device_info

self.driver.spawn //调用 nova/virt/libvirt/driver.py 中的 spawn 函数,首先创建 image,然后创建 domain
       disk_info = blockinfo.get_disk_info
       _create_configdrive
       _create_image //创建镜像
           libvirt_utils.fetch_raw_image
               IMAGE_API.download //调用 glance API 去下载镜像
           _create_and_inject_local_root //做文件注入
           _create_ephemeral
               libvirt_utils.create_image('raw', target, '%dG' % ephemeral_size)
                   utils.execute('qemu-img', 'create', '-f', disk_format, path, size)
           _create_swap
               libvirt_utils.create_image('raw', target, '%dM' % swap_mb)
               nova.privsep.fs.unprivileged_mkfs('swap', target)
       xml = self._get_guest_xml //生成 domain xml 字符串
           conf = self._get_guest_config
               _get_guest_numa_config
               _get_guest_memory_backing_config
               _get_guest_config_meta
               _update_guest_cputune
               _cpu_config_to_vcpu_model
               _configure_guest_by_virt_type
               _set_features
               _set_clock
               _get_guest_storage_config
               self.vif_driver.get_config
               _create_consoles
               _guest_add_spice_channel
               _add_video_driver
               _set_qemu_guest_agent
               _guest_add_pci_devices
               _guest_add_watchdog_action
               _guest_add_memory_balloon
               _guest_add_mdevs
               return guest
           xml = conf.to_xml()
           return xml

       self._create_domain_and_network
           //nova 侧去等待 neutron 侧发送 network-vif-pluggend 事件。neutron-linuxbridge-agent 服务检测 tap 设备,neutron-server 发送 event 事件给 nova-api
           self.virtapi.wait_for_instance_event
           self.plug_vifs(instance, network_info)
           self.firewall_driver.setup_basic_filtering
           self.firewall_driver.prepare_instance_filter
           self._create_domain(xml)
               libvirt_guest.Guest.create(xml, self._host)
                   write_instance_config // nova/virt/libvirt/host.py 中
                   domain = self.get_connection().defineXML(xml)
                   return libvirt_guest.Guest(domain)
               return guest
      _wait_for_boot   //每隔 0.5 秒检查虚机是否启动
_update_instance_after_spawn
_update_scheduler_instance_info
    scheduler_client.update_instance_info
_notify_about_instance_usage
补充:
- port 创建成功后的 dhcp 相关操作(参考 https://blog.csdn.net/gj19890923/article/details/51558598):
- 创建 VM 时,nova-compute 与 neutron 的 plugin 交互,在 neutron 的数据库中创建 VM 所需的 port 信息。
- neutron 数据库中的 port 信息创建完成后,通知 neutron-dhcp-agent 去执行 port_create_end 函数。该函数将数据库中的 port 中的 ip 和 mac 信息加载到 dnsmasq 所需的配置文件中 (包括 host 和 addn_hosts 文件)。
[root@nova 43c0e274-28e3-482e-a32b-d783980fc3ed]# cat addn_hosts

  1.1.1.1 host-1-1-1-1.openstacklocal host-1-1-1-1

  1.1.1.2 host-1-1-1-2.openstacklocal host-1-1-1-2

  1.1.1.10        host-1-1-1-10.openstacklocal host-1-1-1-10

[root@nova 43c0e274-28e3-482e-a32b-d783980fc3ed]# cat host

  fa:16:3e:d1:d7:72,host-1-1-1-1.openstacklocal,1.1.1.1

  fa:16:3e:da:42:50,host-1-1-1-2.openstacklocal,1.1.1.2

  fa:16:3e:3c:a3:3e,host-1-1-1-10.openstacklocal,1.1.1.10
[root@nova 43c0e274-28e3-482e-a32b-d783980fc3ed]# cat leases

  1464599134 fa:16:3e:3c:a3:3e 1.1.1.10 host-1-1-1-10 01:fa:16:3e:3c:a3:3e

  1464598886 fa:16:3e:da:42:50 1.1.1.2 host-1-1-1-2 *

  1464598886 fa:16:3e:d1:d7:72 1.1.1.1 host-1-1-1-1 *
在 VM 启动时,广播 dhcp discover 请求,当 dnsmasq 进程的监听接口 ns-xxx 监听到这种请求时,dnsmasq 进程将根据配置文件 (host 和 leases 文件) 中的内容去判定是否有未分配的 ip 和 mac 为请求者进行提供。
最终 VM 便真实的获取到与保存在数据库中的 ip 和 mac 信息。neutron-dhcp-agent 只是将所创建 VM 的 ip 和 mac 信息从数据库中获取到自己的配置文件中,然后等到 VM 启动时,为它提供。因此 neutron-dhcp-agent 相当于在 VM 和数据库之间起了个中间桥梁的作用。
nova 在 domain 被创建后等待 neutron event 的过程(请参考 http://www.aichengxu.com/linux/9307663.htm)
- 创建 VM 时, nova-compute 服务调用 wait_for_instance_event 函数等待 neutron 侧发送 event 事件。
- neutron 的 neutron-linuxbridge-agent 定时检测 tap 设备的增加或删除,当创建 VM 时,将创建新的 tap 设备,此时将更新 neutron 数据库中的 ports 表,而 neutron-server 服务创建 core_plugin 时,将利用 sqlalchemy 自带的 event 对 neutron 数据库中的 ports 表进行监视,当 ports 表发生变化时,neutron-server 将通过 HTTP 请求的方式发送 event 事件给 nova。
- nova 侧收到 neutron 侧发送的 event 事件,便结束等待,继续创建 VM 下面的操作。
虚机被创建后的 L2 网络操作
虚机被创建后,nova-compute 节点上的 neutron-linuxbridge-agent 会检测到新建的 tap 设备(通过轮询 /sys/class/net/ 里面的 tap 设备),找到后则执行一系列网络方面的操作,包括设置安全组,
tap 设备示例:
[root@test net]# ls
brq8165bc3d-40 eth0 eth1 eth1.120 eth2 lo tap712a2c63-e6 tap83e7c095-f0 tap8f4fcfbb-2b
tap 设备信息:
Port tap93121330-58 updated. Details: {u'profile': {}, u'allowed_address_pairs': [], u'admin_state_up': True, u'network_id': u'8165bc3d-400a-48a0-9186-bf59f7f94b05', u'segmentation_id': 120,u'device_owner': u'compute:nova',
u'physical_network': u'physnet1', u'mac_address': u'fa:16:3e:9f:6f:c5', u'device': u'tap93121330-58', u'port_security_enabled': True, u'port_id': u'93121330-58', u'fixed_ips': [{u'subnet_id': u'ec1028b2-7cb0-4feb-b974-6b8ea7e7f08f', u'ip_address': u'172.16.0.7'}],
u'network_type': u'vlan'}
文档信息
- 本文作者:Lewin
- 本文链接:https://lewinz.com/2021/07/28/openstack-nova-step/
- 版权声明:自由转载-非商用-非衍生-保持署名